English
 中文简体
中文简体
 日本語
日本語
 Español
Content
- 1 The Short Answer: How to Clean Ceramic Cookware Without Ruining It
- 2 Why Ceramic Cookware Requires a Different Cleaning Approach
- 3 Daily Cleaning Routine for Ceramic Cookware
- 4 How to Remove Stuck-On Food from Ceramic Cookware
- 5 How to Deep Clean Ceramic Cookware That Has Lost Its Non-Stick Properties
- 6 What Not to Use When Cleaning Ceramic Cookware
- 7 Cleaning the Exterior and Bottom of Ceramic Cookware
- 8 Storing Ceramic Cookware to Prevent Cleaning Headaches
- 9 How Often Should You Deep Clean Ceramic Cookware
- 10 Signs Your Ceramic Non-Stick Cookware Needs Replacing, Not Just Cleaning
- 11 Practical Tips to Reduce How Much Cleaning Your Ceramic Cookware Needs
The Short Answer: How to Clean Ceramic Cookware Without Ruining It
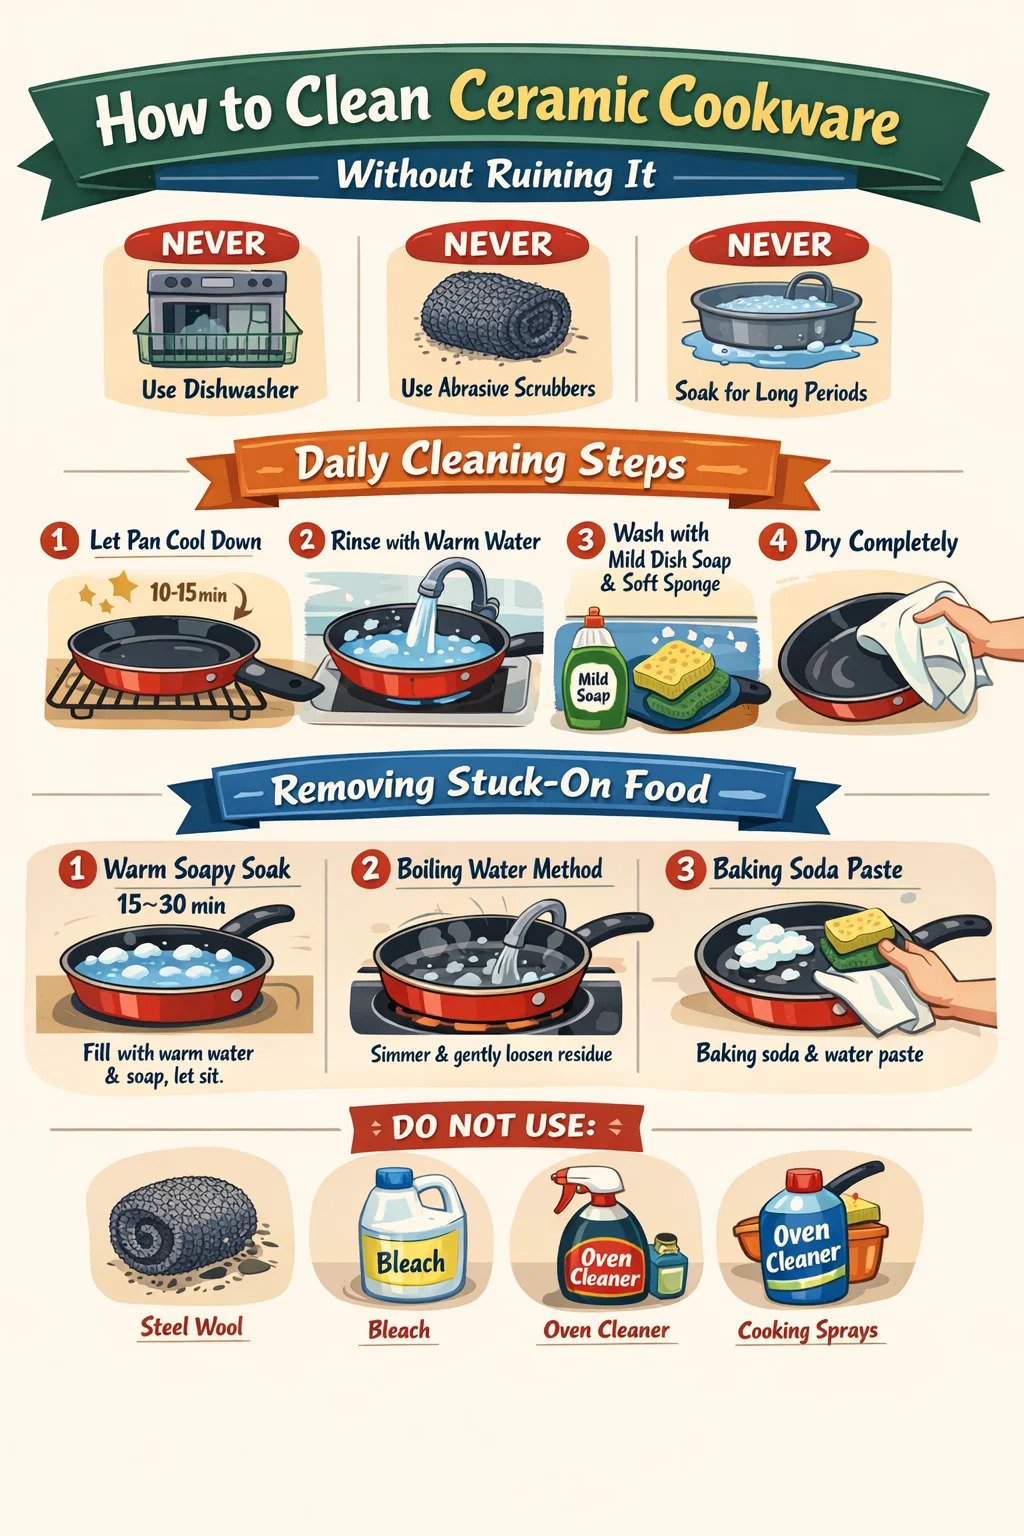
Ceramic cookware should be cleaned with warm water, a few drops of dish soap, and a soft sponge or cloth — immediately after it has cooled down. Never put it in the dishwasher, never use abrasive scrubbers, and never soak it for extended periods. These three rules alone will extend the life of your ceramic non-stick cookware significantly.
Ceramic-coated pans are popular because they offer a non-stick surface free from PTFE and PFOA, which are chemicals associated with traditional non-stick cookware. However, the trade-off is that ceramic coatings are more sensitive to heat damage, harsh chemicals, and rough handling than their stainless steel or cast iron counterparts. Knowing the right cleaning method is directly tied to how long that non-stick performance lasts.
Studies and user reports consistently show that improper cleaning is the number one reason ceramic non-stick coatings fail prematurely — often within 6 to 12 months instead of the 3 to 5 years a well-maintained pan can deliver. This guide covers every cleaning scenario you will encounter, from daily maintenance to stubborn burnt-on residue.
Why Ceramic Cookware Requires a Different Cleaning Approach
Before diving into specific cleaning methods, it helps to understand what ceramic cookware actually is. Most products sold as "ceramic cookware" are not made entirely of ceramic. They are typically aluminum or stainless steel pans coated with a sol-gel ceramic layer — a silica-based coating applied through a spray or dip process and then cured at high temperatures.
This coating is harder than PTFE (Teflon) but also more brittle. Thermal shock — the rapid change from high heat to cold water — can cause micro-cracks in the ceramic layer, which then accumulate over time and destroy the non-stick properties. Abrasive cleaners physically scratch away the coating, and harsh chemicals like bleach or oven cleaner break down the silica bonds at a molecular level.
The non-stick surface of ceramic cookware also degrades through a different mechanism than PTFE. While Teflon peels or flakes, ceramic coatings become porous. Oils and food residues get trapped in those pores, causing food to stick even when the surface appears intact. This is why deep cleaning methods that remove embedded residue — not just surface cleaning — matter so much for ceramic pans.
Ceramic vs. Other Non-Stick Cookware: Key Cleaning Differences
| Cookware Type | Dishwasher Safe | Abrasive Scrubbers | Soaking | Recommended Cleaner |
|---|---|---|---|---|
| Ceramic Non-Stick | No | Never | Avoid | Mild dish soap + soft sponge |
| PTFE (Teflon) Non-Stick | No | Never | Brief only | Mild dish soap + soft cloth |
| Stainless Steel | Yes | With caution | Yes | Bar Keepers Friend, scrub pads |
| Cast Iron | Never | Yes (chain mail) | Never | Hot water + stiff brush |
| Hard-Anodized Aluminum | Sometimes | Avoid | Yes | Dish soap + nylon brush |
Daily Cleaning Routine for Ceramic Cookware
The daily cleaning process for ceramic cookware is straightforward, but the sequence and timing matter. Rushing or skipping steps leads to residue buildup that becomes progressively harder to remove — and more damaging to the coating over time.
Step 1: Let the Pan Cool Completely
This is the step most people skip, and it causes the most damage. Wait at least 10 to 15 minutes after cooking before introducing any water. Running cold water over a hot ceramic pan creates thermal shock. Even if you do not see visible damage, repeated thermal shock creates cumulative micro-fractures in the coating that eventually cause widespread sticking.
Place the pan on a heatproof surface or cooling rack. If you used it on high heat, give it 20 minutes to be safe. Touch the exterior near the base — if it still feels warm, wait longer.
Step 2: Rinse with Warm Water
Once cooled, rinse the pan under warm — not hot — water. This loosens surface food particles before you apply any soap. For a pan with minimal residue (scrambled eggs, sautéed vegetables), this rinse alone may remove most of what is left.
Step 3: Apply Mild Dish Soap and Soft Sponge
Use a small amount of mild dish soap — products like Dawn or Fairy work well. Apply it to a soft sponge, a microfiber cloth, or a silicone scrubber. Avoid anything with a rough texture on one side, including the green or blue scrubbing pads sold alongside regular sponges. Those abrasive pads have a Mohs hardness rating that can physically scratch the ceramic surface with repeated use.
Wipe in gentle circular motions across the entire cooking surface and the interior walls. You do not need to apply significant pressure — if food is not releasing easily, it means the pan needs a soak (covered in the next section), not harder scrubbing.
Step 4: Rinse Thoroughly
Rinse all soap residue off completely. Soap left on the surface can leave a film that builds up with each wash, eventually making the pan feel sticky and reducing its non-stick performance. Tilt the pan and run water around all edges and into the corner where the walls meet the base.
Step 5: Dry Immediately and Completely
Do not leave ceramic cookware to air dry in a dish rack. Water spots contain minerals that can accumulate on the surface and affect the coating over time, especially in areas with hard water. Dry with a soft towel immediately after rinsing. Pay attention to the area around the rim and the exterior bottom.
How to Remove Stuck-On Food from Ceramic Cookware
Even with careful cooking habits, food occasionally sticks — especially with ceramic non-stick cookware, which performs best at low to medium heat. When that happens, the correct response is a targeted soak or a specific cleaning technique, not aggressive scrubbing.
The Warm Water Soak Method
Fill the pan with warm water and a drop of dish soap. Let it sit for 15 to 30 minutes. For the majority of stuck-on food — eggs, cheese, sauces — this is enough. After soaking, wipe gently with a soft sponge. The residue should release without any significant effort.
Never soak ceramic cookware for more than 30 minutes, and never leave it submerged overnight. Extended soaking can weaken the bond between the ceramic coating and the underlying metal, eventually causing the coating to lift or bubble.
The Boiling Water Method for Stubborn Residue
For food that does not release after a soak, try the boiling water method. Add about an inch of water to the pan and place it on the stove over medium heat. As the water heats and begins to simmer, use a wooden or silicone spatula to gently loosen the residue from the bottom. Do not scrape aggressively — let the steam and heat do the work.
Once the residue has loosened, remove the pan from heat, allow it to cool, and clean as normal. This method works particularly well for caramelized sugars, reduced sauces, and cooked-on starch residue from rice or pasta.
Baking Soda Paste for Persistent Spots
When warm water methods are not enough, a baking soda paste is the most effective safe option for ceramic cookware. Mix two tablespoons of baking soda with enough water to form a thick paste. Apply it directly to the problem area and let it sit for 15 to 20 minutes. Then use a damp soft sponge to rub it gently in circular motions.
Baking soda is a mild alkali with a Mohs hardness of about 2.5, which is soft enough not to scratch the ceramic surface while still providing enough gentle abrasive action to lift embedded residue. Rinse thoroughly afterward to remove all traces of baking soda.
White Vinegar for Mineral Deposits and Discoloration
Hard water deposits and mineral buildup can leave white or chalky spots on the ceramic surface that do not respond to regular soap and water. A diluted white vinegar solution handles this effectively. Mix equal parts white vinegar and water, apply to the affected area, and let it sit for 5 to 10 minutes. Wipe with a soft cloth and rinse well.
Vinegar should not be used as a regular cleaner — its acidity, while mild, can gradually affect the ceramic coating if used repeatedly. Reserve it for mineral deposit situations specifically.
How to Deep Clean Ceramic Cookware That Has Lost Its Non-Stick Properties
If your ceramic pan has become noticeably sticky despite careful use, it is likely suffering from oil polymerization — a process where cooking oils break down under heat and bond to the ceramic surface, filling the pores and creating a sticky, varnish-like layer. This is not always visible to the naked eye, but it dramatically reduces non-stick performance.
This is one of the most common complaints about ceramic cookware, and the good news is that in many cases, a thorough deep clean can restore non-stick performance without any need to replace the pan.
The Baking Soda and Hydrogen Peroxide Deep Clean
This method is specifically designed to break down polymerized oils on ceramic surfaces. You will need:
- 3 tablespoons of baking soda
- A small amount of hydrogen peroxide (3% solution, the standard pharmacy variety)
- A soft sponge or cloth
Spread baking soda evenly across the entire cooking surface. Add just enough hydrogen peroxide to make it fizz gently — the chemical reaction helps lift embedded grease. Let it sit for 20 to 30 minutes, then scrub gently with the soft sponge. Rinse completely and dry.
The Dish Soap Boil Method
For deep-set grease and residue that has built up over months, fill the pan with water and add two tablespoons of dish soap. Bring it to a gentle boil over medium heat and let it simmer for 5 to 10 minutes. The hot soapy water penetrates and loosens polymerized oil layers that regular washing cannot reach. Allow to cool, discard the water, and wash normally with a soft sponge.
Re-Seasoning After Deep Cleaning
After a deep clean, it helps to lightly re-season the ceramic surface. Apply a very thin layer — just a few drops — of a high smoke point oil like flaxseed, grapeseed, or avocado oil to the clean, dry cooking surface. Use a paper towel to spread it into an extremely thin, even layer. Heat the pan over low heat for about 2 minutes, then let it cool and wipe away any excess with a clean paper towel.
Do not apply thick layers of oil — excess oil that burns onto the surface will create the same polymerization problem you just cleaned off. The goal is a micro-thin layer that fills surface pores, not a visible coating.
What Not to Use When Cleaning Ceramic Cookware
Just as important as knowing the right methods is knowing what to avoid entirely. Several common kitchen cleaning products and tools will shorten the life of your ceramic non-stick cookware considerably.
- Steel wool and metal scrubbers: These will visibly scratch the ceramic coating within a single use. Even fine steel wool, often marketed for delicate surfaces, is too abrasive for ceramic coatings.
- Bleach-based cleaners: Bleach is highly alkaline and breaks down the sol-gel ceramic matrix. It can cause the coating to discolor and lose adhesion to the base metal.
- Oven cleaner sprays: These contain sodium hydroxide (lye) which is extremely caustic and will destroy a ceramic coating quickly. Even brief contact can cause irreversible damage.
- Bar Keepers Friend and similar oxalic acid cleaners: While safe for stainless steel and some other surfaces, the abrasive particles and acidic compounds in these products are too harsh for ceramic coatings.
- Dishwasher detergents: These are formulated with strong enzymes and alkaline compounds designed to tackle heavy grease at high temperatures. Even if your manufacturer claims the pan is dishwasher safe, repeated dishwasher cycles will degrade the coating significantly faster than hand washing. Consumer testing by multiple cookware review outlets consistently shows ceramic pans that are dishwashed regularly lose non-stick performance 3 to 4 times faster than hand-washed equivalents.
- Cooking sprays (PAM and equivalents): While not a cleaning product, cooking sprays deserve a mention here. They contain propellants and additives that polymerize at lower temperatures than pure oils, building up on the ceramic surface rapidly and causing sticking. Use liquid oils applied with a paper towel instead.
Cleaning the Exterior and Bottom of Ceramic Cookware
Most cleaning guides focus entirely on the cooking surface, but the exterior of your ceramic cookware also needs attention. Grease and food residue that burns onto the outside bottom of the pan can create a thick, carbonized layer that affects heat distribution and is unsightly.
Routine Exterior Cleaning
After each use, once the pan has cooled, wipe the exterior with a soapy sponge. Pay attention to the exterior walls and the rim. The underside of the pan accumulates grease splatter that bakes on over time if not cleaned regularly.
Removing Burnt-On Residue from the Pan Exterior
For burned-on grease on the outside of the pan, which is often stainless steel or hard-anodized aluminum rather than ceramic, you have more flexibility. A baking soda paste applied to the exterior and left for 30 minutes, followed by scrubbing with a nylon brush, removes most carbonized grease buildup. For very heavy buildup, a paste of baking soda and white vinegar applied to the exterior (not the interior ceramic surface) can help break down thick carbon deposits.
Confirm where the ceramic coating ends before using any stronger cleaning method on the exterior. Most ceramic cookware only has a ceramic coating on the interior cooking surface. The exterior is usually bare metal, enamel, or a painted finish, and can tolerate more aggressive cleaning than the interior.
Cleaning Ceramic Cookware Lids
Glass lids that come with ceramic cookware can typically be washed in the dishwasher or with a regular sponge and dish soap. Ceramic or ceramic-coated lids should follow the same gentle guidelines as the pan itself. Never scrub glass lids with abrasives, as micro-scratches can weaken the glass and increase the risk of cracking under heat stress.
Storing Ceramic Cookware to Prevent Cleaning Headaches
How you store ceramic non-stick cookware between uses directly affects how dirty it gets and how difficult cleaning becomes. Poor storage leads to scratches that make the surface rougher, which in turn traps more food, which makes cleaning harder and causes more damage with each attempt.
Use Pan Protectors Between Stacked Pans
Stacking ceramic pans directly on top of each other without any protection is one of the fastest ways to scratch the cooking surface. A set of felt or silicone pan protectors costs under $10 and can extend the life of your ceramic cookware by years. Simply place one between each pan when stacking.
Paper towels also work as a temporary substitute — place one between pans before stacking to prevent direct contact.
Hang Pans or Use a Rack Where Possible
Hanging pans from a pot rack or storing them in a vertical pan organizer eliminates the stacking issue entirely. Pans stored without contact with other cookware stay cleaner and are easier to access without handling multiple items.
Ensure Pans Are Completely Dry Before Storing
Storing a pan that still has moisture on it — even a small amount — can lead to mineral deposits forming on the surface and, in the case of pans with aluminum bases, potential oxidation around the rim or exterior. Always dry completely with a towel before putting the pan away.
How Often Should You Deep Clean Ceramic Cookware
For most home cooks using ceramic non-stick cookware regularly, a deep clean every 4 to 6 weeks is sufficient to prevent oil buildup from becoming a serious problem. If you cook with higher-fat foods frequently (bacon, fried eggs, pan sauces with butter), consider a deep clean every 2 to 3 weeks.
A simple way to know when a deep clean is needed: run your clean, dry finger across the cooled cooking surface. If it does not feel completely smooth and slightly slippery, there is likely residue buildup that regular washing is not removing. That is the signal for a baking soda treatment or a dish soap boil.
| Cleaning Task | Recommended Frequency | Method |
|---|---|---|
| Daily wash | After every use | Mild soap + soft sponge |
| Stuck food removal | As needed | Warm water soak or boiling water method |
| Baking soda spot treatment | As needed | Baking soda paste + gentle scrub |
| Deep oil buildup removal | Every 4–6 weeks | Baking soda + hydrogen peroxide or dish soap boil |
| Mineral deposit removal | When deposits appear | Diluted white vinegar solution |
| Light re-seasoning | After each deep clean | Thin layer of high smoke point oil |
Signs Your Ceramic Non-Stick Cookware Needs Replacing, Not Just Cleaning
Good cleaning habits can dramatically extend the life of ceramic cookware, but the coating does have a finite lifespan. Knowing when cleaning is no longer the answer saves you time and frustration.
- Visible scratches or chips in the coating: Once the ceramic layer has been physically breached, the exposed base metal becomes a site for accelerated corrosion and further coating failure. Cleaning cannot repair scratches.
- Persistent sticking after deep cleaning: If a thorough deep clean does not restore non-stick performance, the coating pores may be permanently damaged or the coating itself may have worn too thin to function properly.
- Discoloration that does not clean off: Some discoloration is cosmetic and harmless. But dark patches that remain after thorough cleaning may indicate areas where the coating has degraded or where metal has begun to react through the coating.
- Flaking or peeling: While less common in ceramic coatings than PTFE, flaking can occur in low-quality ceramic pans. Any pan showing visible flaking should be retired immediately.
- Warping: A warped base does not distribute heat evenly, causing hot spots that burn food regardless of how clean the surface is. Warping is caused by thermal shock and cannot be reversed.
A well-maintained ceramic non-stick pan used at home under normal conditions should last between 2 and 5 years before replacement becomes necessary. Budget pans used daily may need replacing sooner; higher-end brands with thicker ceramic coatings can last longer with proper care.
Practical Tips to Reduce How Much Cleaning Your Ceramic Cookware Needs
The less residue you create during cooking, the less effort cleaning requires — and the longer the ceramic coating lasts. These practices, applied consistently, make a measurable difference.
- Use low to medium heat: Ceramic non-stick cookware performs best below 260°C (500°F). High heat accelerates oil polymerization and can discolor the coating. Most cooking tasks — sautéing, frying eggs, making sauces — work perfectly well at medium or medium-low heat.
- Preheat gradually: Start with low heat and let the pan warm up for 1 to 2 minutes before adding food or oil. Avoid placing a cold pan directly on high heat.
- Use only the right utensils: Silicone, wood, or nylon utensils only. Metal utensils can scratch the surface even when used carefully. This applies to serving spoons, spatulas, whisks, and tongs.
- Apply a thin layer of oil before cooking: Even non-stick surfaces benefit from a small amount of fat. This reduces the chance of food bonding to the surface and makes post-cook cleaning much easier.
- Do not use the pan for high-heat searing: Cast iron, carbon steel, or stainless steel are better suited for tasks that require very high heat, such as searing steaks. Reserving your ceramic pan for lower-temperature tasks extends its life significantly.
- Clean promptly but not immediately: Do not let food sit and dry on the pan for hours, but always let the pan cool before washing. Prompt cleaning once cool prevents residue from hardening onto the surface.