English
 中文简体
中文简体
 日本語
日本語
 Español
Content
- 1 The Short Answer: How to Season a Made In Carbon Steel Pan
- 2 Why Made In Carbon Steel Pans Need Seasoning at All
- 3 What You Need Before You Start
- 4 Removing the Factory Beeswax Coating
- 5 Choosing the Right Oil for Carbon Steel Seasoning
- 6 The Oven Method: Step-by-Step Initial Seasoning
- 7 The Stovetop Method: An Alternative Approach
- 8 What to Cook First to Build the Seasoning Faster
- 9 How to Clean a Seasoned Made In Carbon Steel Pan
- 10 Long-Term Maintenance and Re-Seasoning
- 11 Comparing Made In Carbon Steel to Other Carbon Steel Pans and Pots
- 12 Common Seasoning Mistakes and How to Avoid Them
- 13 Using Made In Carbon Steel Pans on Different Cooktops
- 14 How Long Does It Take to Fully Season a Carbon Steel Pan?
The Short Answer: How to Season a Made In Carbon Steel Pan
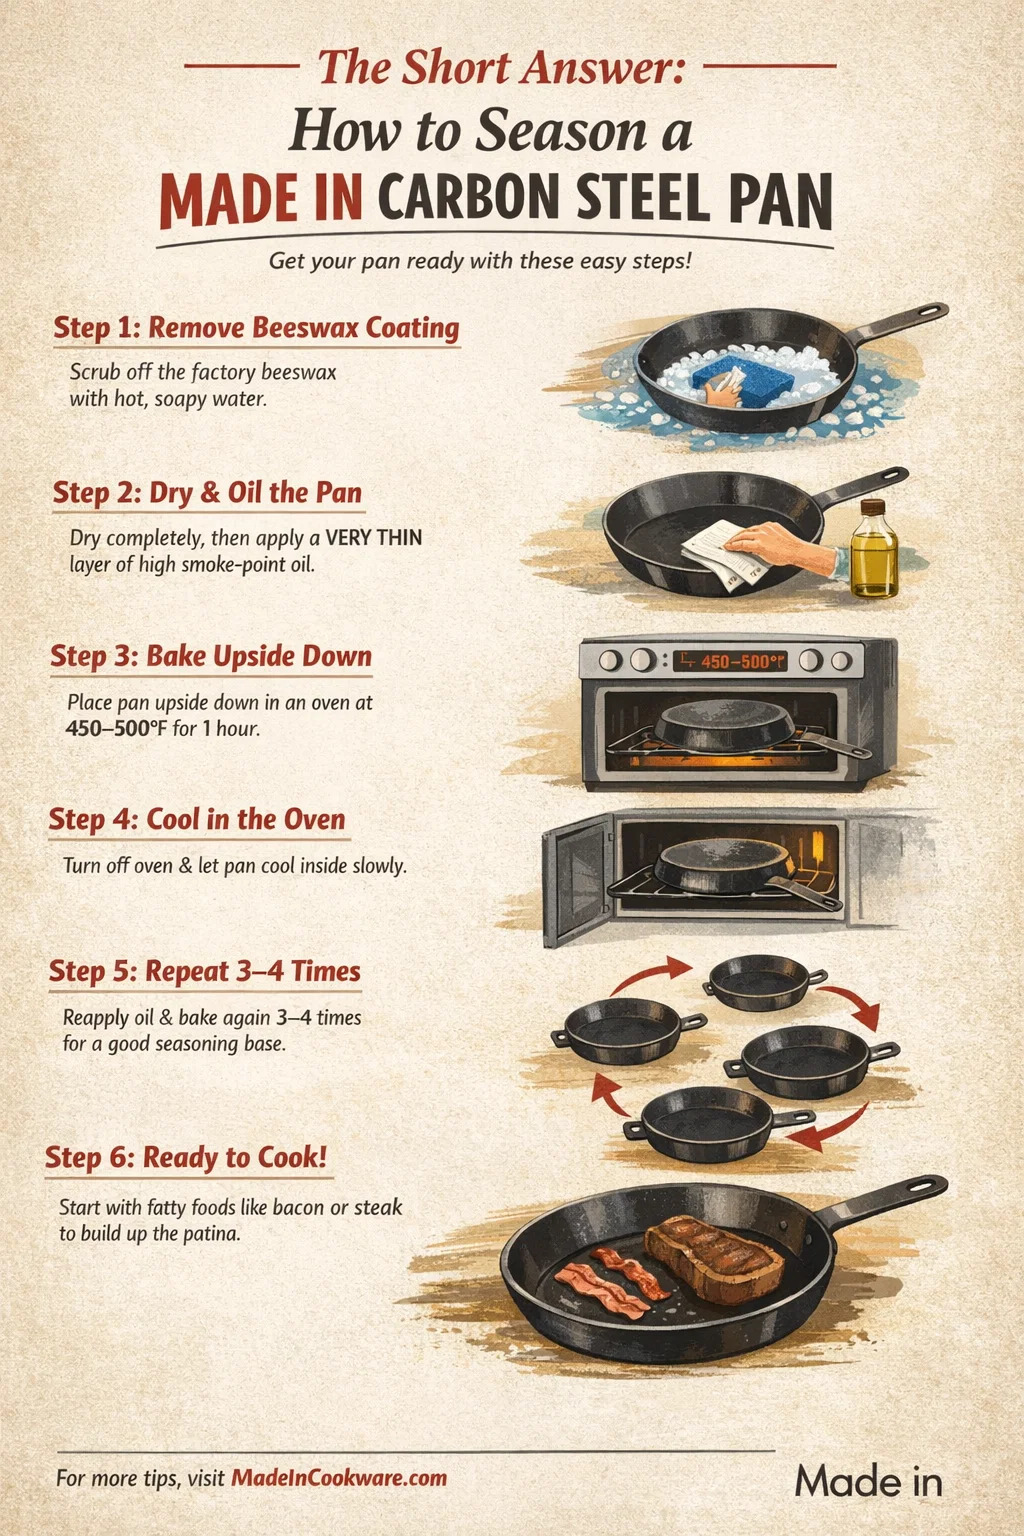
To season a Made In carbon steel pan, you wash off the protective beeswax coating it ships with, dry it completely, apply a very thin layer of high smoke-point oil to the entire surface, and heat it in an oven at 450–500°F until the oil polymerizes into a hard, slick layer. Repeat that process 3 to 4 times before your first cook. That's the core of it. Everything else — the specific oils, the oven temperature nuances, the stovetop method, the long-term care — is just refinement on top of that basic framework.
Made In's carbon steel cookware is beloved by both home cooks and professionals for good reason. The pans and pots are made from 99% iron and 1% carbon, which gives them a surface that responds to seasoning beautifully — eventually rivaling the non-stick release of traditional non-stick coatings, without any synthetic chemicals. But that potential requires you to build the seasoning correctly from day one.
If you've been intimidated by the process, stop. It's not complicated. It takes patience — mostly just waiting for heat cycles to complete — but the steps themselves are straightforward. This guide covers everything: removing the factory coating, choosing your oil, oven vs. stovetop methods, what to cook first, how to maintain the seasoning over time, and how to fix it if something goes wrong.
Why Made In Carbon Steel Pans Need Seasoning at All
Unlike stainless steel pots and pans, which have a passive oxide layer that resists corrosion without any additional treatment, carbon steel is reactive metal. Exposed to moisture and oxygen, it will rust — sometimes within hours. The seasoning layer is literally the pan's protection system as well as its non-stick surface. These two functions come from the same thing: polymerized oil.
When oil is heated past its smoke point, it doesn't just burn off. The fatty acid chains in the oil undergo a chemical transformation called polymerization, cross-linking into a solid plastic-like layer bonded to the metal surface. That layer is hydrophobic (it repels water), reasonably non-stick, and — crucially — it builds on itself over time. Each seasoning session adds more polymerized material, deepening the patina.
Made In ships their carbon steel pans and pots with a thin beeswax coating specifically to prevent rust during shipping and storage. That coating needs to come off before you start building your own seasoning. It's not harmful, but it's also not a substitute for a proper seasoning base layer.
Here's something worth understanding: a fully seasoned carbon steel pan is not like a Teflon-coated pan on day one. It develops gradually. After the initial seasoning rounds, the pan will be noticeably better. After a few months of regular cooking — especially fatty proteins like bacon, steak, and sausage — it becomes exceptional. Some professional cooks describe a well-seasoned carbon steel surface as "better than any non-stick pan they've used." That's the payoff for doing the initial work correctly.
What You Need Before You Start
Gather everything before you begin. The process is smooth when you're not hunting for items mid-step.
- Your Made In carbon steel pan or pot
- Dish soap and a scrub brush or sponge
- A high smoke-point oil (see the oil section below for specifics)
- Two or three lint-free cloths or paper towels
- An oven capable of reaching at least 450°F
- Oven mitts rated for high heat
- Aluminum foil or a baking sheet for the oven rack below (to catch drips)
- About 2 hours of uninterrupted time for the full initial seasoning sequence
One thing people often don't think about: ventilation. Seasoning produces visible smoke, especially on the first round. Open windows, turn on the range hood fan, and consider disabling your smoke alarm temporarily — or at least knowing where it is so you can fan it quickly if needed. This is not a sign that something is wrong. It's normal and expected.
Removing the Factory Beeswax Coating
Made In applies beeswax to their carbon steel pots and pans before shipping. To remove it:
- Fill a sink with hot water and add a good squeeze of standard dish soap.
- Scrub the pan thoroughly — inside, outside, handle, and rim — with a non-abrasive sponge or brush.
- Rinse completely with hot water.
- Immediately dry the pan with a clean cloth or paper towel.
- Place the pan on the stovetop over medium-low heat for 2–3 minutes to evaporate any remaining moisture. You're looking for all visible water droplets to disappear.
This is the one time you'll use soap on a Made In carbon steel pan without any concern. After seasoning is established, soap is generally avoided or used very sparingly. But right now, soap is your friend — it cuts through the wax effectively.
If the pan looks slightly gray or mottled after washing, that's normal. You've just removed the protective coating and are looking at bare steel. This surface is vulnerable. Don't leave it sitting for more than 30 minutes without starting the seasoning process — surface oxidation can begin quickly, especially in humid environments.
Choosing the Right Oil for Carbon Steel Seasoning
Not all oils season equally. The key factors are smoke point (needs to be high enough that the oil polymerizes rather than just burning and smoking), fatty acid composition (highly unsaturated fats polymerize more thoroughly), and how thin you can apply the layer.
The table below compares the most commonly recommended oils for seasoning carbon steel pans and pots:
| Oil | Smoke Point | Polymerization Quality | Notes |
|---|---|---|---|
| Flaxseed oil | 225°F (107°C) | Excellent | Very hard finish; can flake if applied too thick |
| Grapeseed oil | 420°F (216°C) | Very good | Popular choice; neutral flavor; easy to find |
| Canola oil | 400°F (204°C) | Good | Widely available; budget-friendly; works reliably |
| Vegetable shortening (Crisco) | 360°F (182°C) | Good | Traditional cast iron method; applies evenly |
| Avocado oil | 520°F (271°C) | Very good | Highest smoke point; ideal for high-heat seasoning |
| Olive oil | 375°F (190°C) | Fair | Usable but not ideal; can go rancid faster |
| Coconut oil | 350°F (177°C) | Fair | High saturated fat = slower polymerization |
Grapeseed oil is the most practical all-around choice for seasoning Made In carbon steel pans and pots. It has a high enough smoke point to work well at 450–500°F oven temperatures, polymerizes into a hard durable layer, and doesn't leave behind any strong flavor. Avocado oil is arguably better in terms of pure smoke-point headroom, but it's also more expensive.
A note on flaxseed oil: it became very popular in carbon steel and cast iron communities around 2012 after a widely shared article claimed it produced the hardest, most durable seasoning of any oil. While that's technically true — flaxseed oil has a very high proportion of alpha-linolenic acid, which polymerizes aggressively — it's also prone to flaking if the layers are applied even slightly too thick. For beginners, grapeseed or canola oil is much more forgiving.
Whatever oil you choose, the single most important rule is this: apply it extremely thin. More on that in the next section.
The Oven Method: Step-by-Step Initial Seasoning
The oven method is recommended for the initial seasoning of Made In carbon steel pans because it heats the entire surface — including the sides and exterior — evenly and consistently. Here is the process in full detail:
Step 1: Preheat the Oven
Set your oven to 450–500°F (232–260°C). Place a sheet of aluminum foil on the lower rack to catch any oil drips. Let the oven fully preheat before the pan goes in — this matters because a stable temperature produces a more even polymerization.
Step 2: Apply an Extremely Thin Oil Layer
Put about half a teaspoon of oil on a paper towel or lint-free cloth. Rub it over the entire pan — inside cooking surface, outside, handle, rim, everything. Then take a clean dry paper towel and buff most of it back off. The pan should look nearly dry when you're done. If you can see a film of oil on the surface, you've applied too much. Thick oil layers don't polymerize evenly — they bead up, turn sticky, and create uneven blotchy spots that peel off. Thin is the rule. Thinner than you think.
Step 3: Bake the Pan Upside Down
Place the pan upside down on the middle oven rack. This prevents oil from pooling in the cooking surface, which would create drips and uneven buildup. Bake for one full hour. Do not open the oven during this time.
Step 4: Cool Gradually in the Oven
Turn the oven off and leave the pan inside to cool with the oven. This gradual cooling helps the polymerized layer bond more firmly to the metal. It takes roughly 45 minutes to an hour for the pan to reach a safe handling temperature. Don't try to speed this up by running cold water over a hot pan — the thermal shock can warp carbon steel permanently.
Step 5: Repeat 3 to 4 More Times
Once the pan has cooled, apply another thin oil layer and repeat the entire process. For initial seasoning of Made In carbon steel pans and pots, completing 3 to 4 full oven rounds gives you a functional base layer. The pan will have taken on a golden-brown to dark-brown patina by the end. That color is normal and good — it's polymerized oil.
After the final round, let the pan cool completely, then wipe it very lightly with a cloth barely touched with oil before storing. Your initial seasoning is done.
The Stovetop Method: An Alternative Approach
Made In actually recommends a stovetop method for the initial seasoning of their carbon steel pans, and it works well — particularly for people without ovens large enough to fit a large skillet or for those who want a quicker setup time. Here's how it works:
- Wash and dry the pan as described above (removing the beeswax).
- Place it on the stovetop over medium-high heat. Allow it to heat until you see the surface begin to change color — you'll notice slight iridescent blue-gray tones spreading across the steel. This is normal oxidation happening at the surface level and it's a good sign that the metal is hot enough.
- Remove from heat briefly. Apply a very thin layer of oil to the interior surface with a cloth or paper towel.
- Return to heat and allow the oil to smoke off. Move the pan to distribute heat. The oil should smoke and then appear to dry — that's polymerization happening.
- Repeat this thin-oil-heat cycle 3 to 5 times on the stovetop.
- Allow to cool and store.
The limitation of the stovetop method is that it doesn't season the sides and exterior of the pan as evenly. Oven seasoning tends to produce a more complete base layer. If you're seasoning a large carbon steel pan or a deep carbon steel pot from Made In, the oven method is worth the extra time.
That said, the stovetop method becomes your default ongoing maintenance tool after the initial seasoning is established. Every time you cook, you're essentially adding another micro-layer of seasoning — particularly when cooking with fat at high heat.
What to Cook First to Build the Seasoning Faster
The initial oven seasoning builds the foundation. Actual cooking builds everything on top of it. Your first few cooking sessions matter — not because you'll ruin the seasoning if you cook the wrong thing, but because the right foods genuinely accelerate patina development.
Best foods to cook first on a freshly seasoned carbon steel pan:
- Bacon: Naturally fatty, cooks at high temperatures, and the rendered lard coats and builds the pan surface with every cook. After even two rounds of bacon, most carbon steel pans show noticeable improvement in surface darkness and release.
- Sausage or chorizo: Same principle as bacon. The fat renders out and does the work for you.
- Steak: A great early cook. Use butter or a neutral oil, cook at high heat, and you'll end up with a well-seasoned pan that smells like a steakhouse.
- Fried potatoes: Cooked in plenty of oil, these are a classic seasoning food. They don't release particularly cleanly in the first few rounds, but they add solid seasoning layers.
- Smash burgers: High fat content, high heat, direct surface contact. One of the most effective foods for building carbon steel seasoning quickly.
Foods to avoid cooking early in the pan's life:
- Acidic foods: Tomatoes, citrus juice, wine sauces, and vinegar-based dishes react with carbon steel and can strip early seasoning. Wait until the pan has a well-established dark patina before cooking these — typically 2–3 months of regular use.
- Delicate fish: Eggs and fish before the pan is truly seasoned will stick badly and lead to frustration. They can damage early seasoning layers. Save these for when the pan is mature.
- Anything requiring prolonged simmering in liquid: Long braises and soups aren't the right use of carbon steel pans anyway (those are better suited to stainless or enameled cast iron pots and pans), but particularly on a new pan they can degrade the surface.
How to Clean a Seasoned Made In Carbon Steel Pan
Cleaning carbon steel pans is one of the areas where people either get it completely right or completely wrong. The cleaning method directly affects how well the seasoning holds up over time.
For Everyday Cleaning After Cooking
While the pan is still warm (not scorching hot, but comfortably warm), rinse it with hot water. Use a stiff brush or a chain mail scrubber to remove food bits. In most cases, this is all you need. No soap required for routine cleaning. Dry the pan immediately and thoroughly with a cloth or paper towel. Place it back on the stove over medium-low heat for a minute or two to ensure it's completely dry.
While the pan is still warm from drying, apply a tiny amount of oil — just a few drops rubbed across the interior with a paper towel. This renews the protective layer and preps the pan for next use. This habit takes about 30 seconds and is the primary reason some carbon steel pans stay in perfect condition for decades.
For Stubborn Stuck-On Food
If food has really stuck, fill the pan with about an inch of water and bring it to a boil on the stovetop. Most stuck food loosens within 2–3 minutes of simmering. Pour out the water, scrub with a stiff brush, rinse, and proceed with drying and oiling as above.
Another option for tough residue: add a tablespoon of coarse kosher salt to the dry pan with a small amount of oil and scrub with a paper towel. The salt acts as a mild abrasive without removing seasoning layers the way harsh scrubbing pads can.
Can You Use Soap?
The traditional answer has always been "never use soap on carbon steel or cast iron." The more nuanced answer: a small amount of mild dish soap used occasionally, followed by immediate thorough drying and re-oiling, will not destroy a well-established seasoning. Modern dish soaps are less caustic than the lye-based soaps the old prohibition referred to. That said, there's no reason to use soap if hot water and a brush get the job done — and using soap regularly will gradually strip the seasoning over time. Save it for when you actually need it.
Long-Term Maintenance and Re-Seasoning
With consistent use and proper care, a Made In carbon steel pan's seasoning gets better every month. But life happens — pans get left wet, acidic food strips a patch, someone washes the pan with too much soap. Knowing how to recognize and fix seasoning problems keeps your pan in great shape long-term.
Signs the Pan Needs Re-Seasoning
- Visible rust spots (orange-brown discoloration, especially after sitting wet)
- Food that previously didn't stick is suddenly sticking everywhere
- Dull, dry-looking patches in the cooking surface where the patina has worn through
- A metallic taste transferring to food
- Flaking or peeling in spots (usually caused by too-thick seasoning layers that didn't bond properly)
Fixing Rust on a Carbon Steel Pan
Surface rust is not a death sentence for carbon steel cookware. Scrub the rust off with steel wool or a chainmail scrubber and a little dish soap. Rinse, dry completely, and then apply 2–3 rounds of oven seasoning exactly as described in the initial seasoning section. The pan will be back in service. Even heavily rusted carbon steel can typically be fully restored — the same process applies, just with more aggressive initial scrubbing to remove the oxidation down to bare metal.
Fixing Sticky or Gummy Seasoning
Stickiness is almost always caused by too much oil applied during a seasoning session, creating layers that never fully polymerized. To fix it: scrub back the sticky layer with steel wool, wash with soap, dry, and re-season using a much thinner oil application than before. Thin application is the single most common mistake in carbon steel seasoning. If you're getting stickiness, you're using too much oil. Period.
How Often to Do Maintenance Seasoning
With daily use, most Made In carbon steel pans and pots don't need dedicated re-seasoning oven sessions beyond the initial setup — the cooking process itself continuously adds to the patina. A maintenance session (1–2 oven rounds) is useful when the pan has been unused for a long period, has developed rust, or has had seasoning stripped by accident. Otherwise, the after-cook oiling routine handles ongoing maintenance.
Comparing Made In Carbon Steel to Other Carbon Steel Pans and Pots
Made In's carbon steel line sits in the premium segment of the carbon steel market. Understanding how it compares to other options puts the seasoning process in context — because not all carbon steel pots and pans are the same thickness or construction, and those differences affect how the seasoning behaves.
| Brand | Steel Gauge | Factory Coating | Seasoning Difficulty | Price Range (10") |
|---|---|---|---|---|
| Made In | 3mm | Beeswax | Moderate | $100–$120 |
| de Buyer Mineral B | 2–3mm | Beeswax | Moderate | $70–$90 |
| Matfer Bourgeat | 2–3mm | Protective oil | Moderate | $80–$100 |
| Lodge Carbon Steel | 2mm | Factory seasoning | Easy (pre-seasoned) | $50–$70 |
| Vollrath | 1.5–2mm | Protective coating | Moderate | $40–$60 |
Made In's 3mm thickness puts it on the heavier side for carbon steel, which means slightly more even heat distribution and a surface that retains heat better when cold food hits it. The tradeoff is weight — it's notably heavier than thinner-gauge carbon steel pots and pans. The seasoning process is identical regardless of gauge; thicker pans just take a little longer to heat up and cool down during each oven round.
Common Seasoning Mistakes and How to Avoid Them
Most problems with carbon steel seasoning trace back to a small number of recurring errors. Here are the ones that trip people up most often:
- Using too much oil: The most common mistake by far. Results in sticky, gummy, or patchy seasoning. Rule of thumb: apply oil, then wipe almost all of it back off.
- Not drying the pan completely before seasoning: Any residual moisture prevents proper oil bonding. Always follow the stovetop heat-dry step before applying oil.
- Seasoning at too low a temperature: Below 400°F, most oils don't polymerize fully. They just coat the surface in a layer that wipes away or turns sticky. Use 450°F minimum.
- Skipping multiple rounds: One oven round doesn't build enough of a base layer. The first round lays a foundation; subsequent rounds build actual protection. Do at least 3–4 initial rounds.
- Cooking acidic food too early: Tomatoes, citrus, and wine attack immature seasoning. Many people cook something acidic in their first week and then wonder why the seasoning is gone.
- Storing the pan while damp or storing it in a humid environment: A well-sealed seasoning tolerates occasional moisture, but a freshly seasoned pan left in a damp cabinet or stored with a lid on can develop surface rust. Store with the lid off or a paper towel placed inside to absorb moisture.
- Running cold water over a very hot pan: Warps the steel. Let the pan cool before any contact with water.
- Giving up too early: A new carbon steel pan that sticks or looks uneven after the first few cooks is normal. The seasoning isn't fully established yet. Persistence and fatty cooking sessions solve most early issues within a few weeks.
Using Made In Carbon Steel Pans on Different Cooktops
Made In carbon steel pans and pots are compatible with all cooktops — gas, electric coil, glass-ceramic, and induction. However, each surface has a slight nuance in how it affects seasoning development:
- Gas: The most forgiving. Direct flame heats quickly and unevenly across the bottom, which initially creates uneven patina distribution but evens out with use.
- Electric coil: Slower to heat, but works well. Be careful about overheating — the coils can get very hot and heat carbon steel unevenly, potentially causing warping if done repeatedly.
- Glass-ceramic/induction: Works well with Made In's carbon steel (the pans are fully induction-compatible). Heat up gradually rather than throwing the pan on high immediately — the rapid and concentrated heat at the center can warp thinner pans, though Made In's 3mm gauge handles it better than lighter-gauge pots and pans.
- Oven and broiler: Made In carbon steel handles oven temperatures up to 1200°F, making them excellent for searing then finishing in the oven — a technique that adds substantially to the seasoning.
How Long Does It Take to Fully Season a Carbon Steel Pan?
This question gets different answers depending on what "fully seasoned" means. Here's a realistic timeline for Made In carbon steel pans used regularly:
- After initial seasoning (day 1): The pan has a basic layer that prevents rust and provides minimal non-stick properties. Fatty foods cook well; eggs and fish will still stick.
- After 2–4 weeks of regular cooking: The patina has deepened to a dark brown in frequently used areas. Non-stick performance has improved noticeably. The pan is starting to develop personality.
- After 2–3 months of regular cooking: A pan cooked on nearly daily with fatty proteins reaches a dark, fairly even patina. Eggs can be cooked with a small amount of butter or oil. Most acidic foods can now be cooked without stripping seasoning.
- After 6+ months to 1 year: A well-used carbon steel pan reaches peak performance. The surface is black, slick, and essentially non-stick. At this stage, the pan is arguably the best cooking surface you can own for high-heat searing.
The variable is how often you cook and what you cook. Someone who fries bacon twice a week will have a better-seasoned pan in one month than someone who cooks steamed vegetables once a week for a year. The seasoning responds to fat and heat — give it those things regularly and it develops quickly.